
by Roe Pressley
DocuCopies.com
Published:
Half-fold self mailers (also called bi-fold mailers, folded self mailers, or FSM for short) are one of the most popular and economical formats used in direct mail marketing campaigns.
Because they mail without an envelope, your design is the first thing a recipient sees. This makes folded self mailers particularly effective for promotions, event announcements, real estate marketing, and EDDM (Every Door Direct Mail) campaigns.
The most important thing to get right when designing a folded self mailer is the mailing panel. This is the panel that faces out when the piece is mailed, displaying the recipient's address, return address, and postage permit. This guide walks you through the four steps to set it up correctly so your mailer meets USPS requirements and mails without a hitch.
Four Steps to Set Up Your Mailing Panel
Choose Which Panel Will Be Your Mailing Panel
Your first decision is which panel of your half-fold mailer will carry the addressing and postage. On a standard 8.5" x 11" sheet folded in half, you'll have four panels total: a front panel (or "cover"), a back panel, and two interior panels. Either the front or the back can serve as your mailing panel depending on how it works with your design.

The one requirement USPS has is that the top edge of the mailing panel must be the open (unfolded) edge, not the folded edge. On a half-fold mailer, this means the fold needs to be at the bottom when the piece is oriented for mailing. This is a USPS automation requirement: mail processing machines read and scan the address area at the top of the piece, so the open edge must face up.
If you're designing an 11" x 17" bi-fold mailer (which folds down to 8.5" x 11"), the same rule applies: the final folded edge goes on the bottom, and the open edge is at the top of the mailing panel.
Leave Room for the Address Block, Return Address, and Postage Permit
Once you've decided which panel faces out, you'll need to reserve space for three elements that are required on every USPS direct mail piece: the recipient address block, your return address, and the postage/bulk mail permit indicia.
Here's how to lay out the mailing panel:
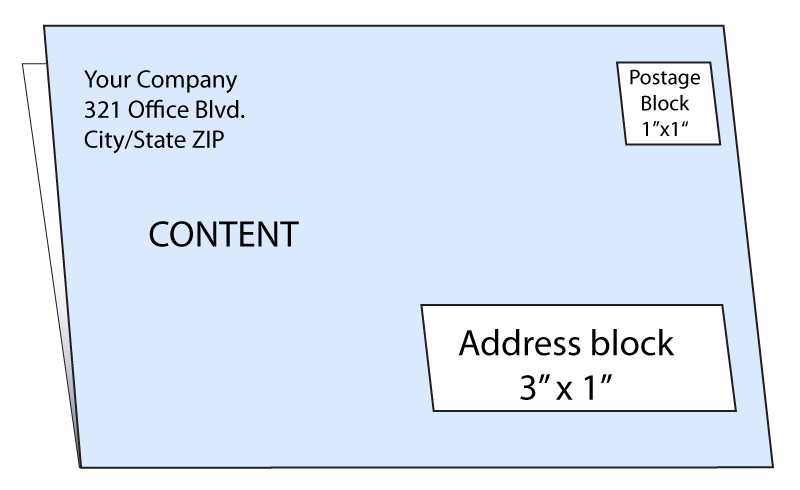
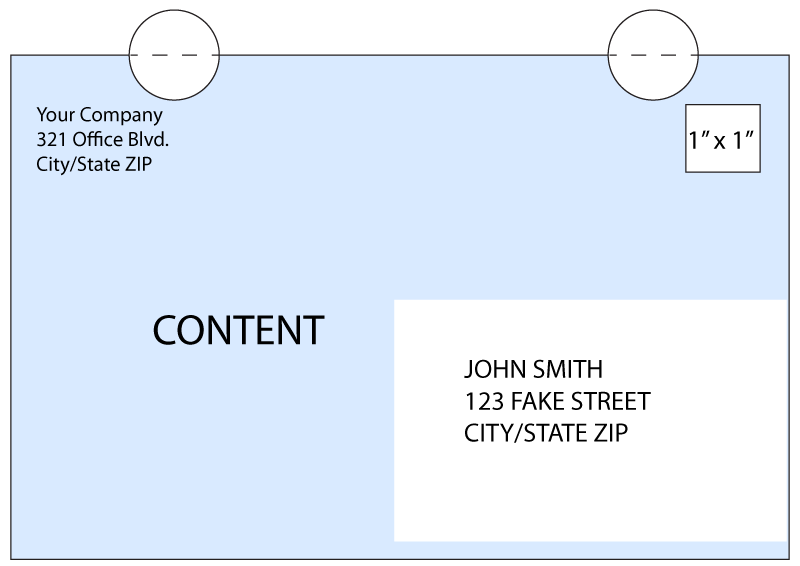
- Address block: Reserve a 3" x 1" clear area in the lower-right portion of the mailing panel for the recipient's name and address. Alternatively, you can leave the entire right half of the mailing panel free of content. This gives us maximum flexibility when placing the address during printing and ensures that the barcode the USPS prints on your piece has plenty of white space to scan cleanly.
- Postage/bulk mail permit: Reserve at least a 1" x 1" area in the upper-right corner of the mailing panel for the postage permit indicia (the bulk mail stamp). Do not place any design elements in this area.
- Return address: Place your return address in the upper-left corner of the mailing panel. This should be its own clearly defined area, separate from any promotional content.
 Full-panel design with address/postage blocks
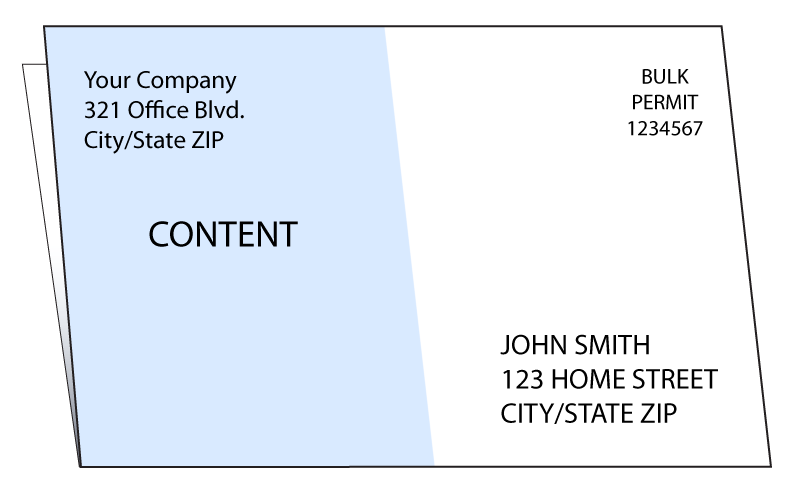 The right side is blank, leaving plenty of room for addressing and postage
A common mistake is designing the mailing panel with background colors, textures, or images that run through the address and permit areas. While some light background color may be acceptable to USPS, those areas should have high contrast — ideally a white or very light background — so that the printed address and USPS barcode are clearly legible. If in doubt, go for a blank white background.
Leave a 0.5" Clearance for the Wafer Seals
USPS regulations require that folded self mailers be sealed closed before mailing so that open edges don't catch on postal processing equipment. The standard method is wafer seal tabs. These round sticker-like seals are applied along the open edge of the mailer.
Important: Leave at least 0.5" of clearance at the very top of the mailing panel. We place 1" round wafer seal tabs along the open top edge to seal your mailer closed before it enters the mail stream. USPS requires these for folded self mailers. If your return address or any other content runs too close to the top edge, the tabs will cover it. Keeping 0.5" clear at the top of the mailing panel ensures the tabs seal the piece without obscuring your return address or permit.
For design purposes, you generally don't need to worry about where the tabs go or how many are required. We handle the tabbing as part of our direct mail fulfillment process. We apply the appropriate tabs to the open top edge after printing and folding your mailer. As long as you leave enough space for the wafer seals, your design can run freely across all other panels.
Place Your Return Address in the Upper-Left of the Mailing Panel
Your return address must appear in its own clearly defined area in the upper-left corner of the mailing panel. This is both a USPS requirement and a practical necessity. If a piece is undeliverable, the post office may use the return address to send it back to you (depending on the mailing service you order).
Keep the return address visually distinct from your promotional content. Using a slightly smaller font size than your body copy, and keeping it in the upper-left corner away from the address block and content areas, is the standard approach.
Remember that the top 0.5" of the mailing panel is reserved for tabs. Position your return address below that clearance zone (starting at least 0.5" from the top edge) so that it remains fully visible after the wafer seals are applied.
If you'd like us to review your mailing panel layout before going to print, just let us know in the job notes. We're happy to help identify any issues with your design to ensure your half-fold mailers don't run into any problems at the post office.
Frequently Asked Questions About Half-Fold Self Mailers
Which edge of a folded self mailer needs to be at the top when mailing?
The open (unfolded) edge must be at the top of the mailing panel. The folded edge goes at the bottom.
More details...
This is a USPS automation requirement. Mail processing machines scan the address area at the top of the piece, so the open edge must face up to allow the machinery to read and sort the mail correctly. If the fold is at the top, your mailer may be rejected or require manual processing.
How big should the address block area be on a half-fold self mailer?
Reserve at least a 3" x 1" clear area in the lower-right portion of the mailing panel for the recipient address block.
More details...
Alternatively, you can leave the entire right half of the mailing panel free of content, which gives maximum flexibility for address placement and ensures the USPS barcode has plenty of clear white space to scan cleanly. Avoid placing background colors, textures, or images in the address area. A white or very light background is strongly preferred.
Do folded self mailers need to be sealed before mailing?
Yes. USPS requires folded self mailers to be sealed closed with wafer seal tabs before entering the mail stream.
More details...
Wafer seals are round sticker-like tabs applied along the open edge of the mailer. They prevent the open edges from catching on postal processing equipment. If you order direct mail fulfillment through us, we handle the tabbing after printing and folding, so you don't need to source or apply the seals yourself.
How much clearance do I need to leave at the top of the mailing panel for the wafer seals?
Leave at least 0.5 inches of clear space at the very top of the mailing panel so the wafer seals don't cover your return address or postage permit.
More details...
We apply 1" round wafer seal tabs along the open top edge of the mailer. If your return address or any design content runs too close to the top edge, the tabs will cover it. Position your return address starting at least 0.5" from the top edge to ensure it remains fully visible after sealing.
Can I use a full-bleed design on the mailing panel of a folded self mailer?
You can use a full-bleed design on most of the mailing panel, but you must keep the address block, postage permit area, and return address zones clear of dark backgrounds or busy imagery.
More details...
USPS requires that the address block and postage permit area have high contrast so the printed address and barcode are clearly legible. While some light background color may be acceptable, a white or near-white background in those zones is the safest approach. The rest of the mailing panel (and all other panels) can be designed freely with full-bleed color and imagery.
 Processing...