
How to Design a Bleed Document
Here we will go over file setup for a bleed document. This will cover the most basic way to properly setup a bleed. If you are using a professional design program such as InDesign and know how to setup the bleed settings when exporting your document, then much of this tutorial will not apply to you.
What is a bleed?
A bleed is where printing goes all the way to the edge of the page. This is also called borderless printing and is commonly seen on book covers, posters, flyers and postcards, but is less common with black and white graphics and text pages.
By default, when printing digitally, there will be a 0.25" white printer margin around the sheet of paper when an item is printed. In order to print a bleed and eliminate the white margin, we must print on oversized paper and then cut it down to the finish size. For the final product to work correctly, the image must also be oversized so when we cut the paper we also trim part of the image to create the edge-to-edge print, or bleed.
Are you designing in Canva?
If so, this requires a different bleed setup process. Click here to learn how to setup bleeds in Canva.
NOTICE: Designing bleeds for books requires an additional 0.25" of safety zone on the binding edge.
This is defined in STEP 2 below.
STEP 1: Adjust Your Document Size
When you are creating a bleed document to print with us, your document size must be 0.5 inches larger than the finished size. This means that an 8.5" x 11" bleed document must be submitted to us as 9" x 11.5".
Many programs have either a custom page size option or allow you to adjust the size of the page through a settings menu. We cannot bleed a file whose document size is the same as the finish size.
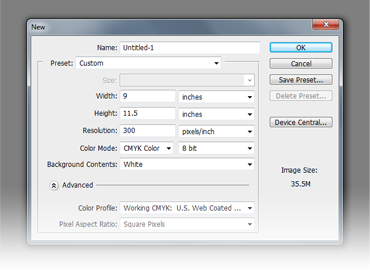
In Photoshop you can change the page size when you create a new document. Don't forget about changing color mode to CMYK!
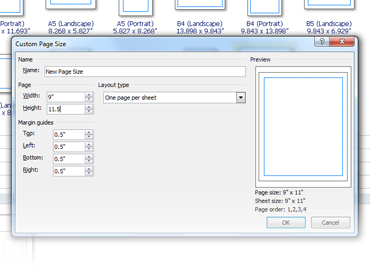
In Microsoft Publisher you can create a custom page size when you select blank page sizes or you can change the size under publication options.
STEP 2: Create Your Margins
Once you have created the larger document size you will want to adjust your margins. In the program you are using you will either need to set specific margins or create guides at 0.25" and 0.5" around the document. The first guide at 0.25" around is where your document will be cut to create the bleed. The second guide at 0.5" (called the safety zone) will ensure that any important content you have, such as text, is not cut off when we go to cut your document.
Designing Bleeds for Books? If you're ordering 3-hole drilling, spiral, perfect, coil, or comb binding, make sure leave an additional 0.25" in the safety zone on the binding edge. This will ensure that your text and other important content is not right up against the binding.
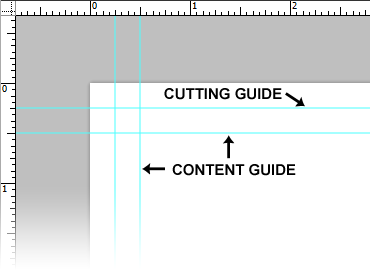
In Photoshop you can add guides by clicking and dragging from the ruler. If you hold down shift the guide will snap to the ruler increments.
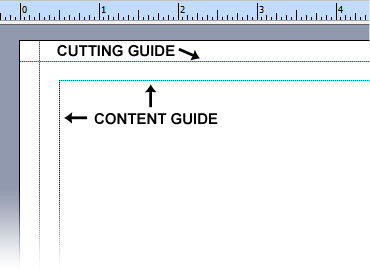
In Microsoft Publisher you can set the base 0.5" margin during page setup and drag the cutting guide from the ruler.
STEP 3: Extend Your Background
Now that you have setup your document and margins you can begin designing your file. The most important part of the bleed design is to ensure that anything you want to bleed is extended all the way to the edge of the document. For an 8.5" x 11" document this means that any background colors or images should go all the way to the edge of the 9" x 11.5" file.
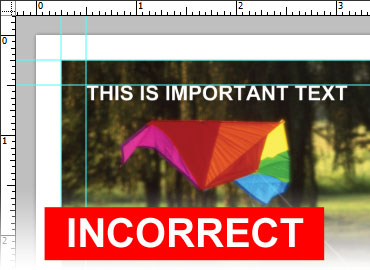
Here the background image is aligned with the cutting guide. This is incorrect and will not result in a proper bleed.
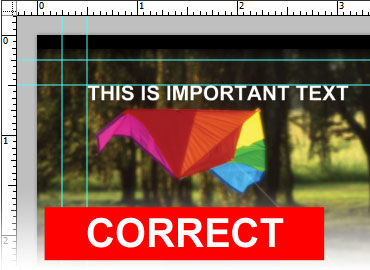
Here the background image is extended to the edge and all important text is within the content guide. This is a correct bleed setup.
STEP 4: Review and Save
After you have completed the design of your file it is a good idea to carefully review the file to make sure everything will print the way you want it to. First thing to check is the margins or guides you have setup. Make sure that no text or important imagery that you dont want cut off is outside of the inner 0.5" margin.
Second, you will want to check that no content is aligned with the 0.25" margin. If you have content that is aligned with this margin it may not bleed. If the paper were to shift when we cut your document then any content aligned here might not bleed to the edge. If you do have content that is aligned to the 0.25" margin you will need to extend this to the edge of the document.
Third, you will need to save or export your file. If you are saving or exporting to a PDF file you will need to check your PDF size settings to make sure the output document is that 0.5 inch larger size. For an 8.5 x 11 this means that the PDF output size should be 9 x 11.5 not letter. Many programs default PDF creation to letter size so you will need to adjust this before exporting. Often to change the PDF paper size you will need to go under advance settings, or do a custom size.
Finally, verify that your file matches our general file setup guidelines. Once you have verified this, you're done! You can upload your beautiful bleed file.
 Processing...