STEP 1: Determine the spine size
Enter the total number of pages, less the covers, in the number of pages input below. This calculator assumes you are printing double sided. If you are printing single sided you will need to double the amount of pages entered.
When you've entered the number of pages and selected your paper type that you are printing on the calculator will tell you what the spine width is and if you are able to have text printed on the spine. If the spine is too small then you will not be able to have text on it.
Number of Pages:
Enter number of pages less the covers. If you are printing single sided, double the number of pages entered.
Type of Paper:
Spine Width
| Inches: | |
| Picas: | |
| Pixels (300dpi): |
Spine Text Width
| Inches: | |
| Picas: | |
| Pixels (300dpi): |
STEP 2: Setup the cover
For the sake of this tutorial we will assume that we have 150 pages less the front and back cover and we're printing on 24/60# laser white smooth paper. When we enter this information in the calculator above we get a result of .337" for the spine width and .212" for the spine text height.
To setup the size of the document for the cover we need to factor in the page width plus the spine width and add on the bleed margins. Let's design an 8.5" x 11" perfect book cover. That means we'll have the front and back cover on one page, which gives us a size of 17" x 11". We'll add on the spine which gives us 17.337" x 11" and then we'll add the bleed margin of .5" which gives us a final document size of 17.837" x 11.5". Now you could design the cover at this size but we are going to design the page at a standard size of 18" x 12" and adjust our guides and margins to get 17.837" x 11.5".
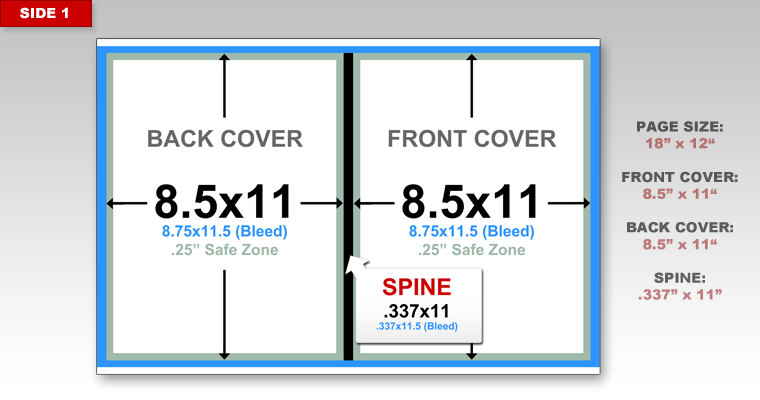
The best way to setup the cover is start with the spine and and work your way out. We'll start at 9", the center of the document, and create margins .1685" on each side to create our spine area of .337". From there we can create the front and back cover which will be 8.75x11.5 for bleed purposes. The front cover will bleed a .25" on the top, right, and bottom. The back cover will bleed a .25" on the top, left, and bottom. Both covers should also have a .25" safe zone around the page to ensure that no important content like text gets cut off when we trim and assembled the books.
Side 2 of the cover has the inside front cover on the left and the inside back cover on the right. For the perfect binding process there cannot be any printing where the inside pages will be glued to the cover. To factor in this area in which there can be no printing we take our spine size of .337" and add .25" on each side. This gives us a non-printing area of .837" x 12".
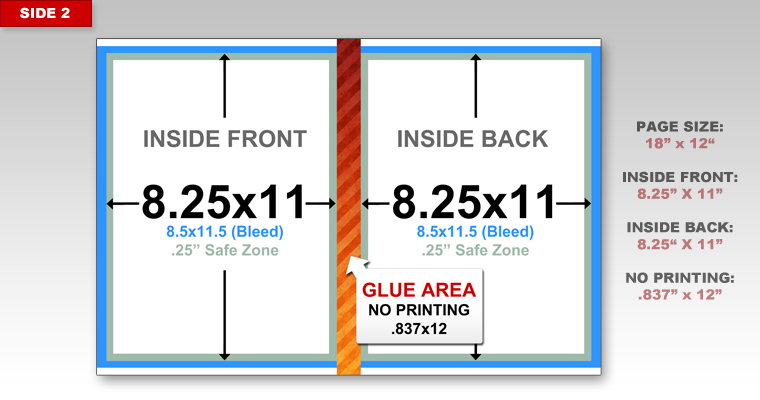
To retain even margins with the no printing area our main content area for the inside front and back covers has shrunk slightly to 8.25" x 11". Our bleed and safe zone areas have remained the same.
STEP 3: Designing the cover
For our cover design we have created a slightly larger spine background that will overlap the front and back cover by .25". This is purely for aesthetics and is not required on your design. We also have the background image and the spine background color extended out to 11.5" and the full width of the page. You could extend the background to 12" in height but it is not required.

The width of our spine is .337" and contains our spine text which is .212" wide. We've extended the red background of our spine .25" across the front and back covers. This is purely for our design and is not required. You could have a spine background that is exactly the size of the spine if you want.
Side 2 of the design will contain the inside front cover on the left and the inside back cover on the right. If your perfect bound book is only going to have single sided covers then this step will not apply to you.
For our design the inside front cover will be blank and our inside back cover will have a red thank you portion overlapping a skyline of minneapolis. As you can see we have faded out the skyline picture as it gets closer to the no printing area. Make sure when you design your file that you do not have any content in the no printing area.

STEP 4: Review and Save
If you have further questions about designing a bleed perfect bound cover then please review our general bleed design tutorial. If after reviewing that page you still have questions please email or call to speak with one of our prepress technicians.
Once your design is completed you should be ready to upload your files. Make sure that the file you are uploading is 18" x 12" and not standard tabloid size (17" x 11"). If you are saving to a PDF and keep getting a size of 17" x 11" then you will need to adjust your PDF page size to a custom size of 18" x 12".
 Processing...