How to Design a Tri-Fold Brochure
Here we will go over file setup for a tri-fold brochure. This will include information on creating both a bleed and non-bleed brochure.
Already have your brochure designed? Print trifold brochures here, or see all folding options for brochures:
Brochure PrintingSTEP 1: Create a New Document
When you are creating a new brochure design, you will need to know from the start whether or not you will be printing with a bleed. Bleeds are when print coverage extends to the edge of the sheet rather than leaving the default .25" blank printer margins. Deciding to print with or without bleeds before you start will save you time and effort.
For the sake of this tutorial we will be designing an 8.5x11 tri-fold brochure with and without a bleed. These same steps can be followed on larger size documents such as legal and tabloid brochures.
Trifold Brochure Templates
| Size | No Bleed | Bleed |
|---|---|---|
| 8.5" x 11" - Outside | JPG | JPG |
| 8.5" x 11" - Inside | JPG | JPG |
Non-Bleed Brochure Setup:
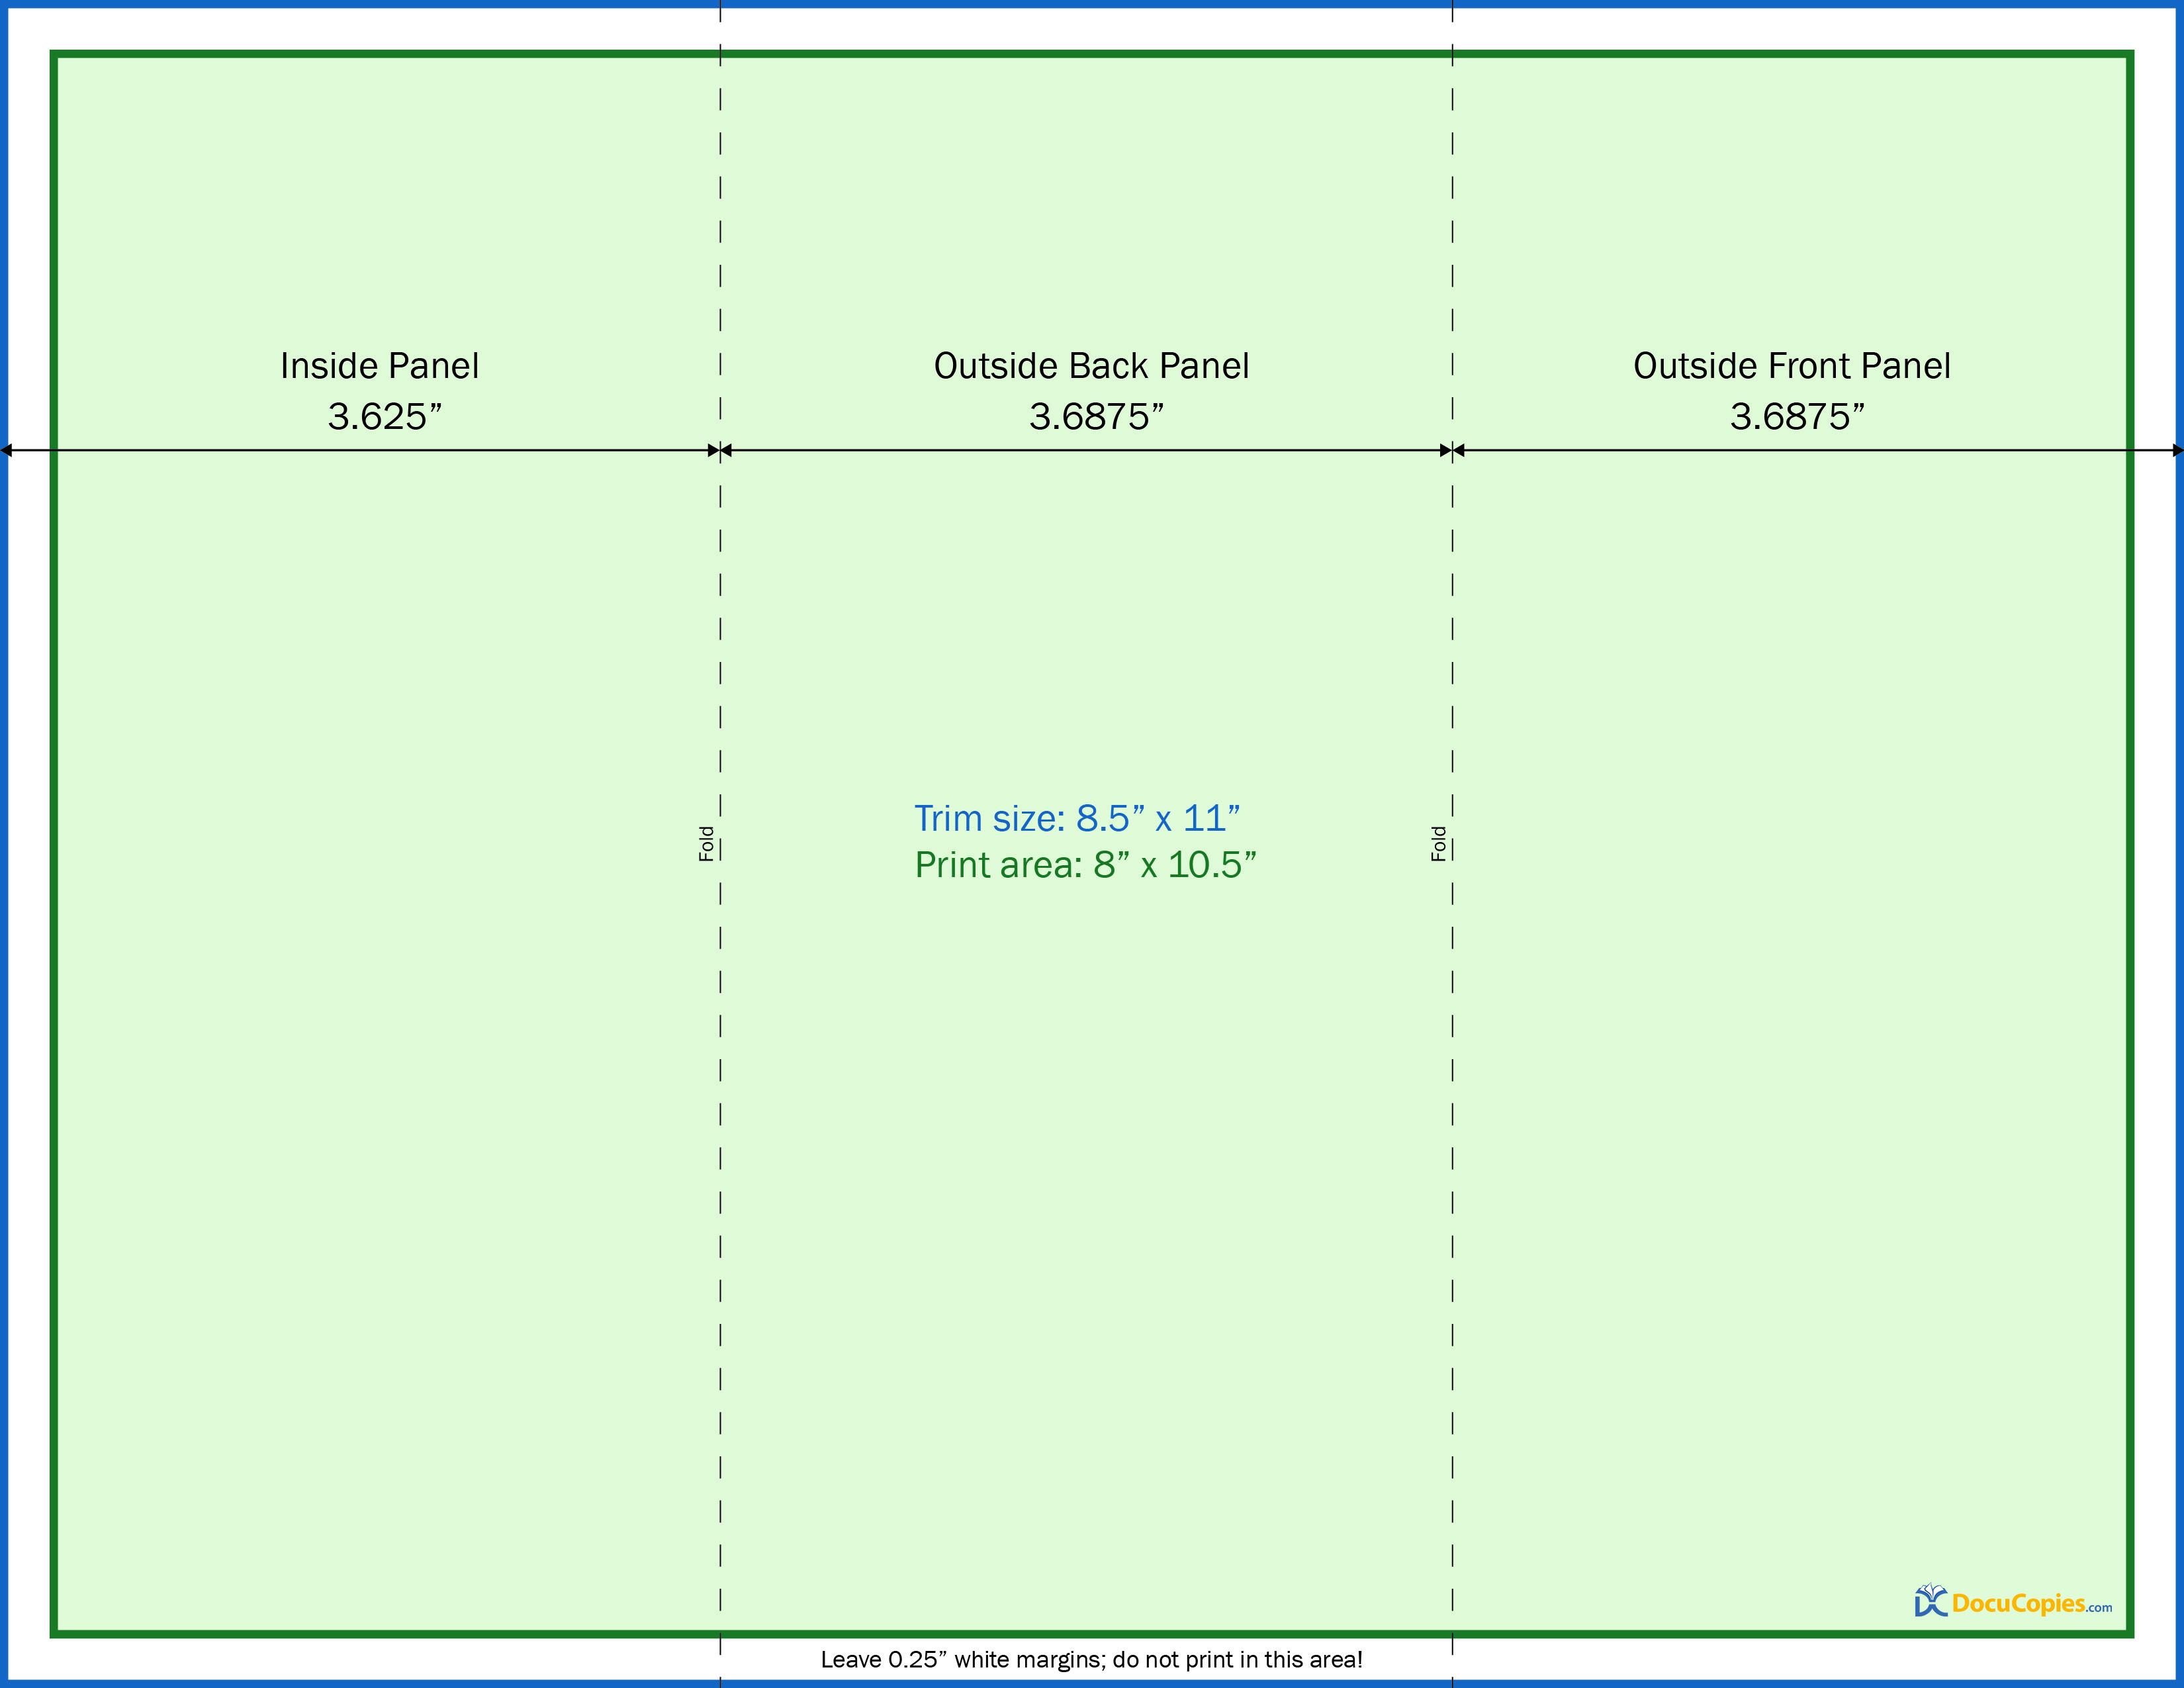
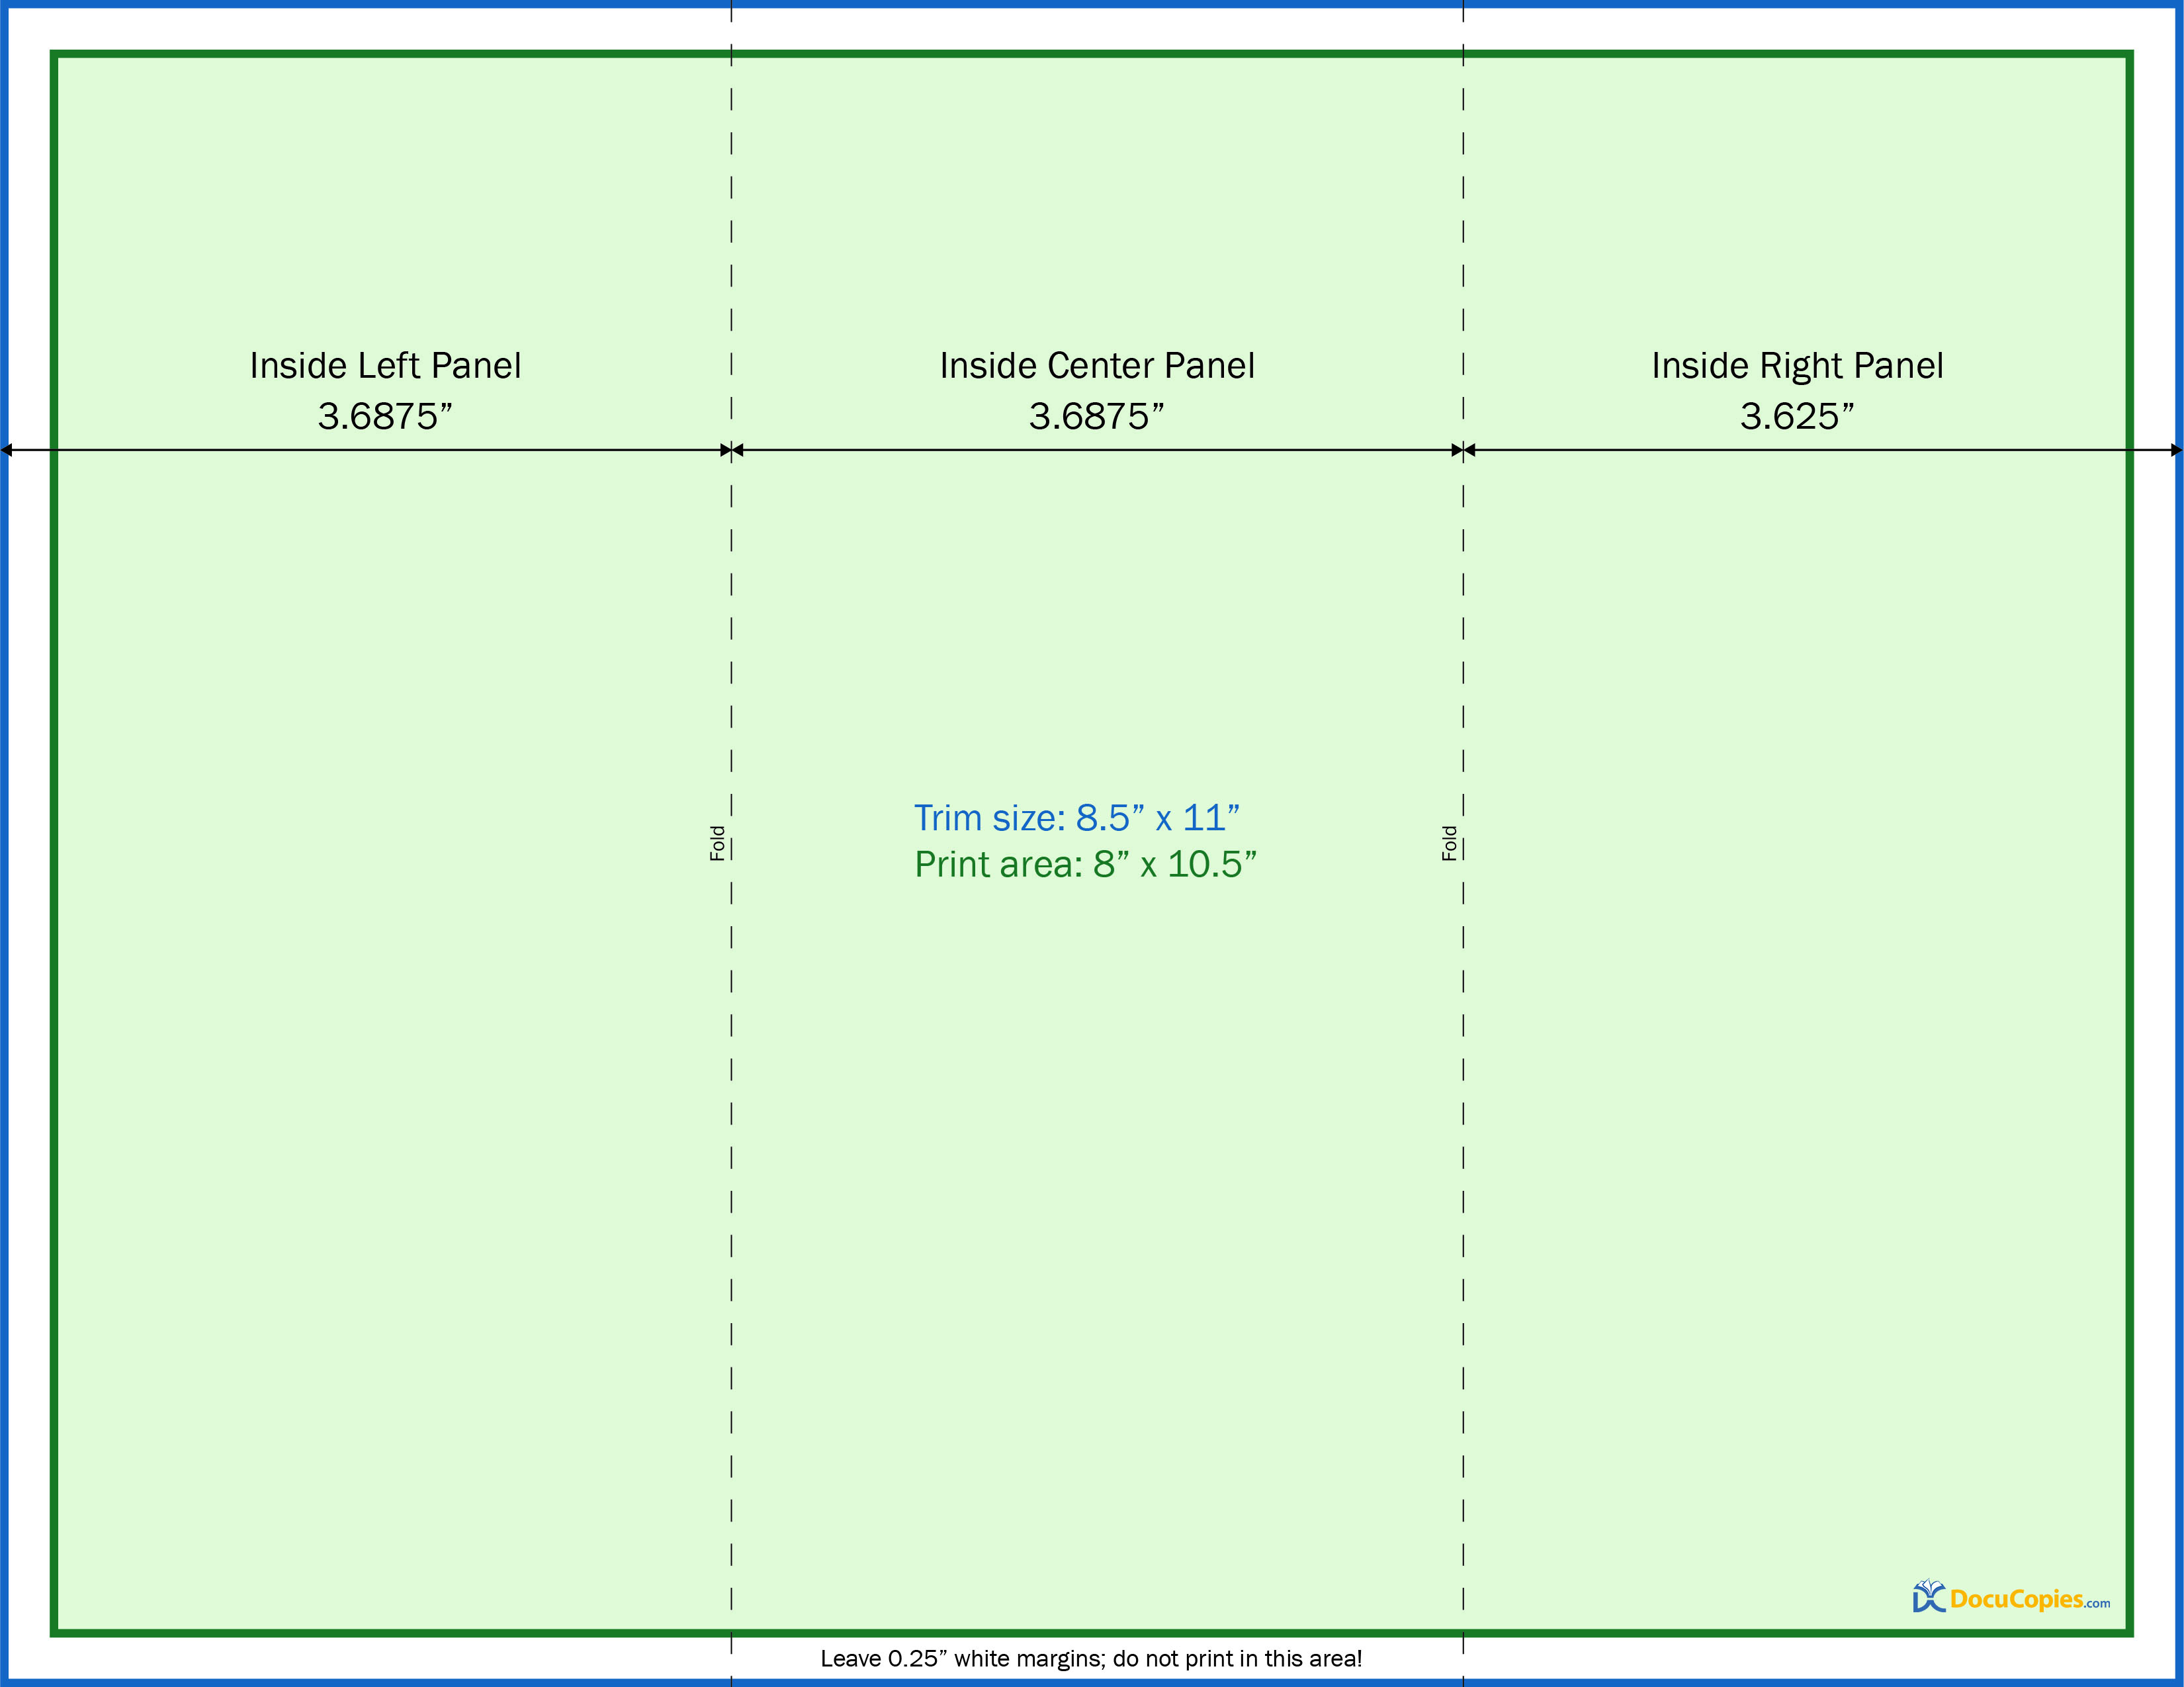
To create a non-bleed brochure we will create a document that is the same size as our finish size, 8.5x11. Then you will want to create an outer margin around the page of .25". This is the printer margin, nothing should be in this space. When you are done with your design this space should be completely white. Once we have that margin then you can create the 3 panels of the brochure. The front and back panels should each be 3.6875" wide by 8.5" tall, while the inside panel which gets folded in should be 3.625" wide x 8.5" tall. When this is completed you will have the correct layout for a non bleed brochure.
Brochure: Outside

Brochure: Inside

The size of our non-bleed brochure page is 8.5" x 11" with a .25" printer margin and a .25" safe zone between panels. The .25" safe zone between panels is to make sure that no important content like text gets folded through. NO CONTENT (IMAGES, BACKGROUND COLORS, TEXT) SHOULD BE IN THE OUTSIDE PRINTER MARGIN. If you have content in the printer margin then we probably will not be able to print your brochure without you adjusting the file.
Bleed Brochure Setup:
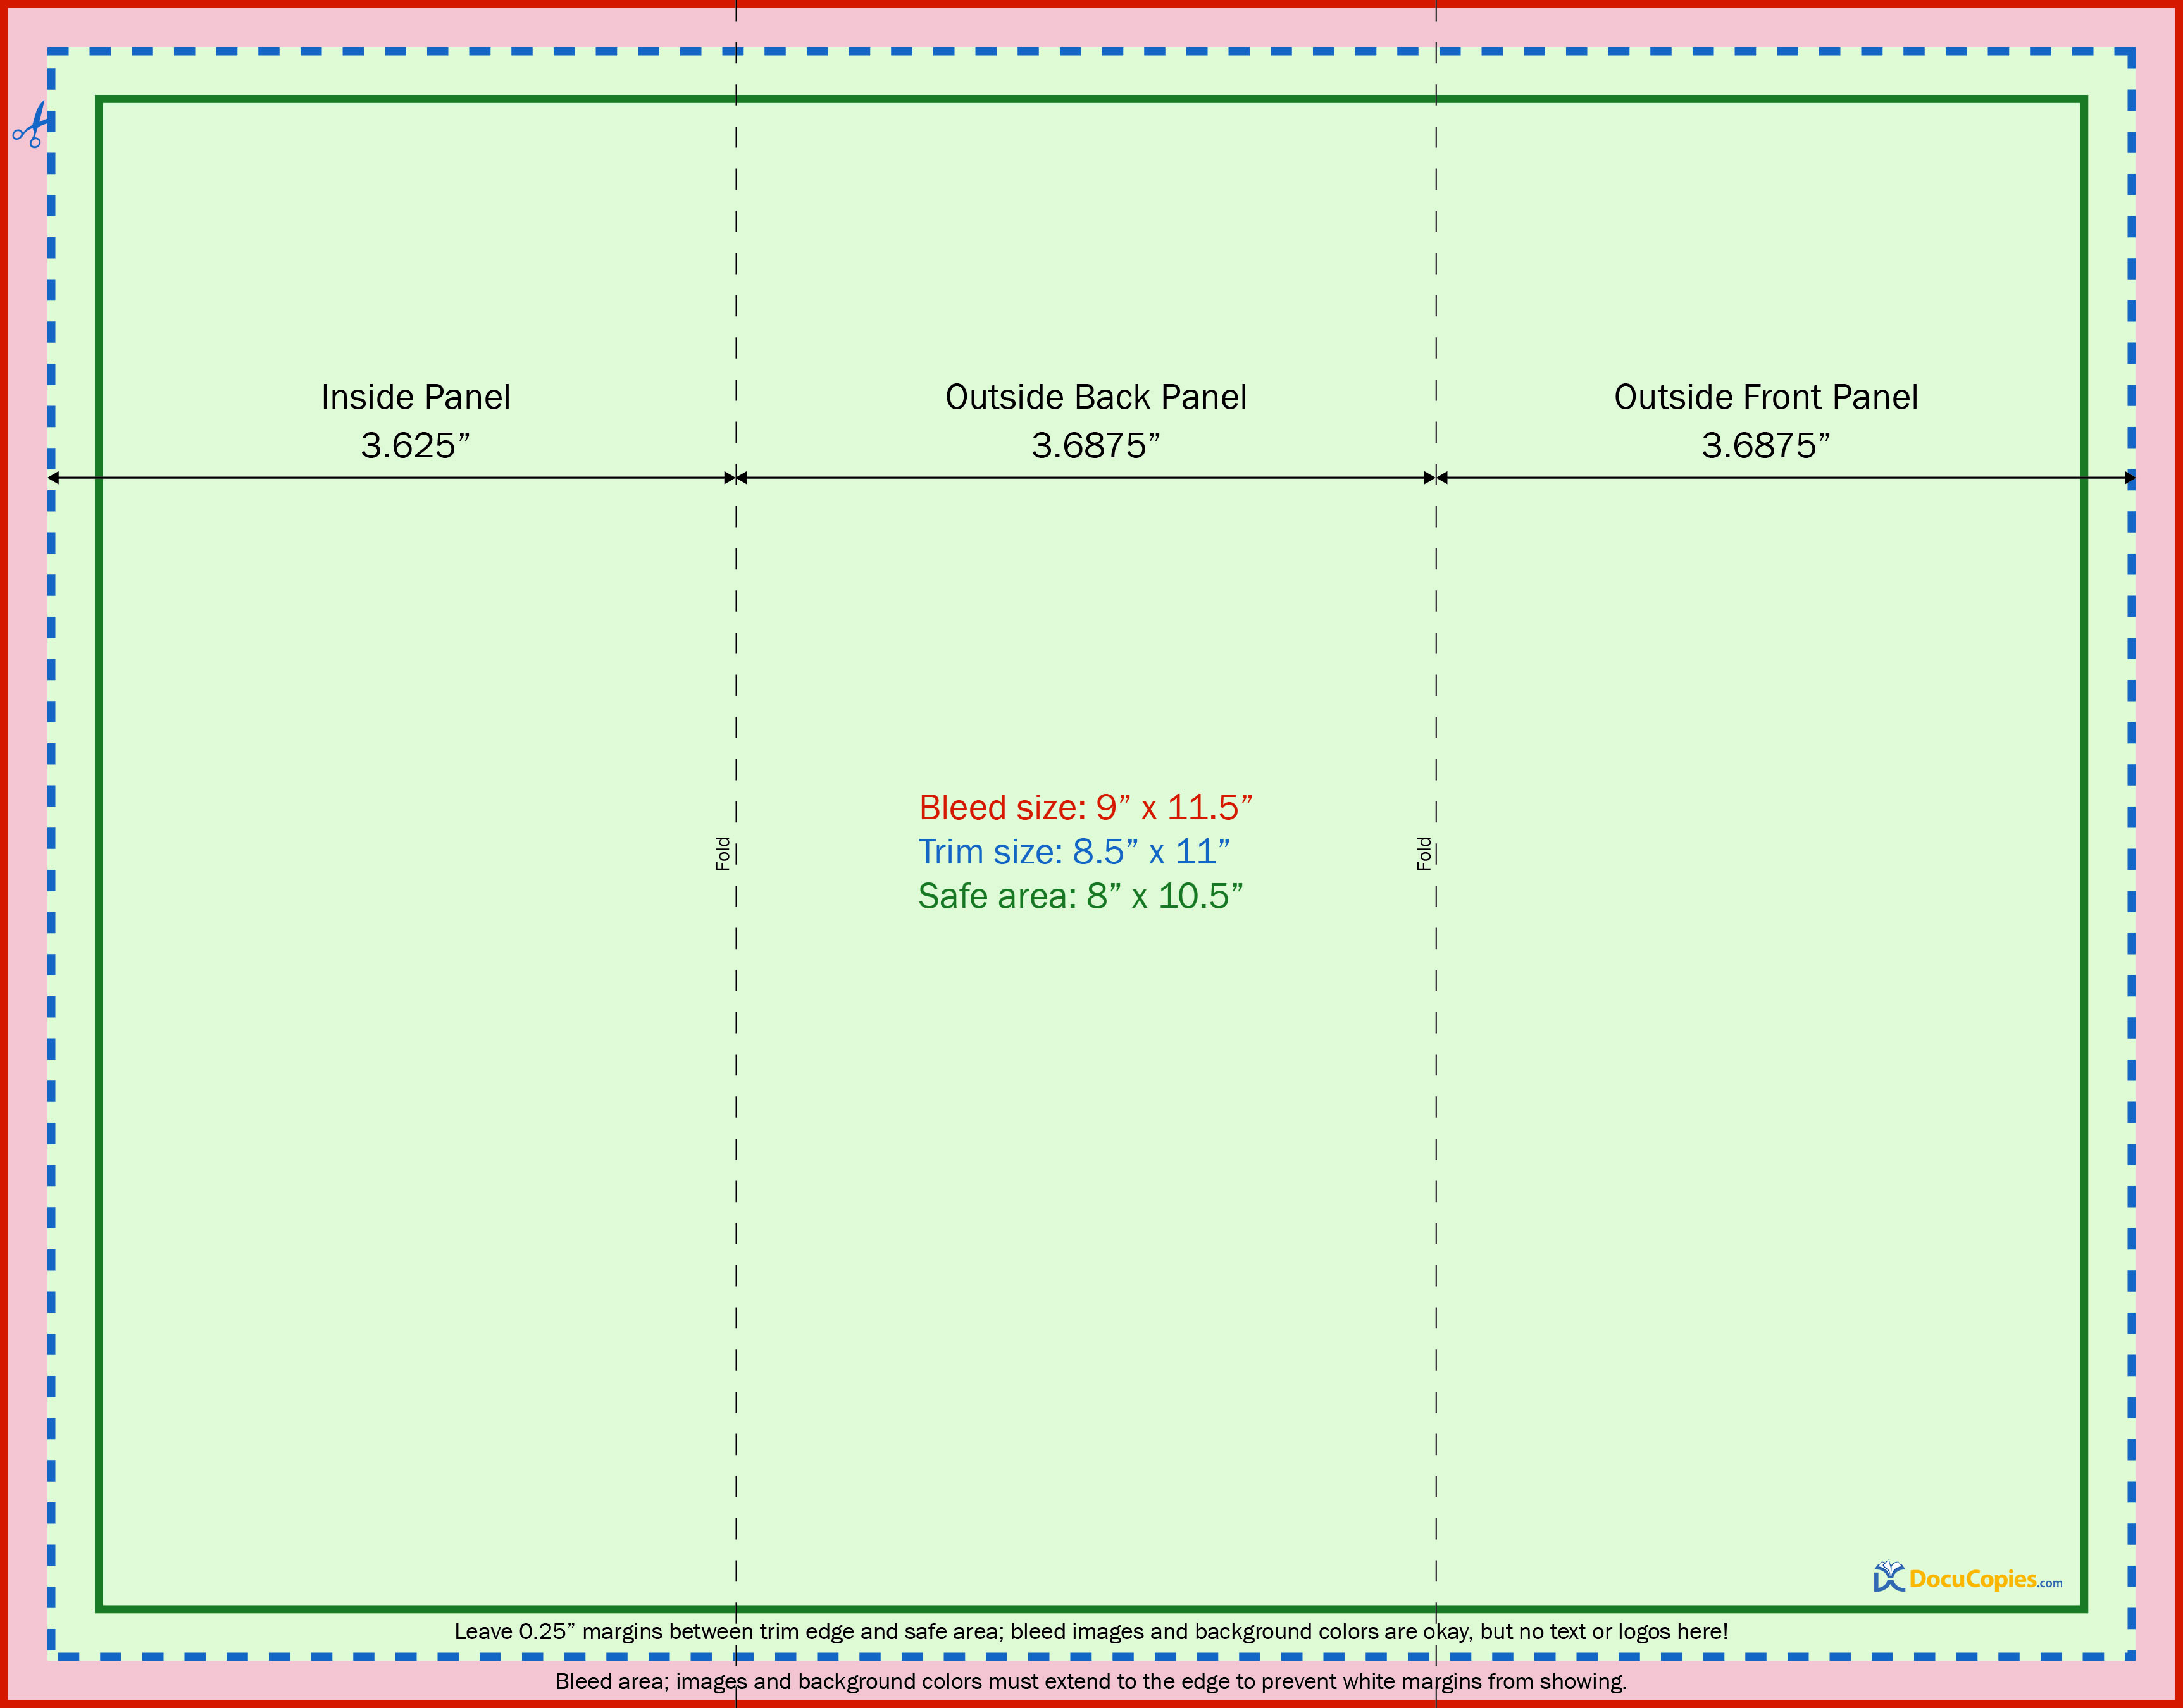
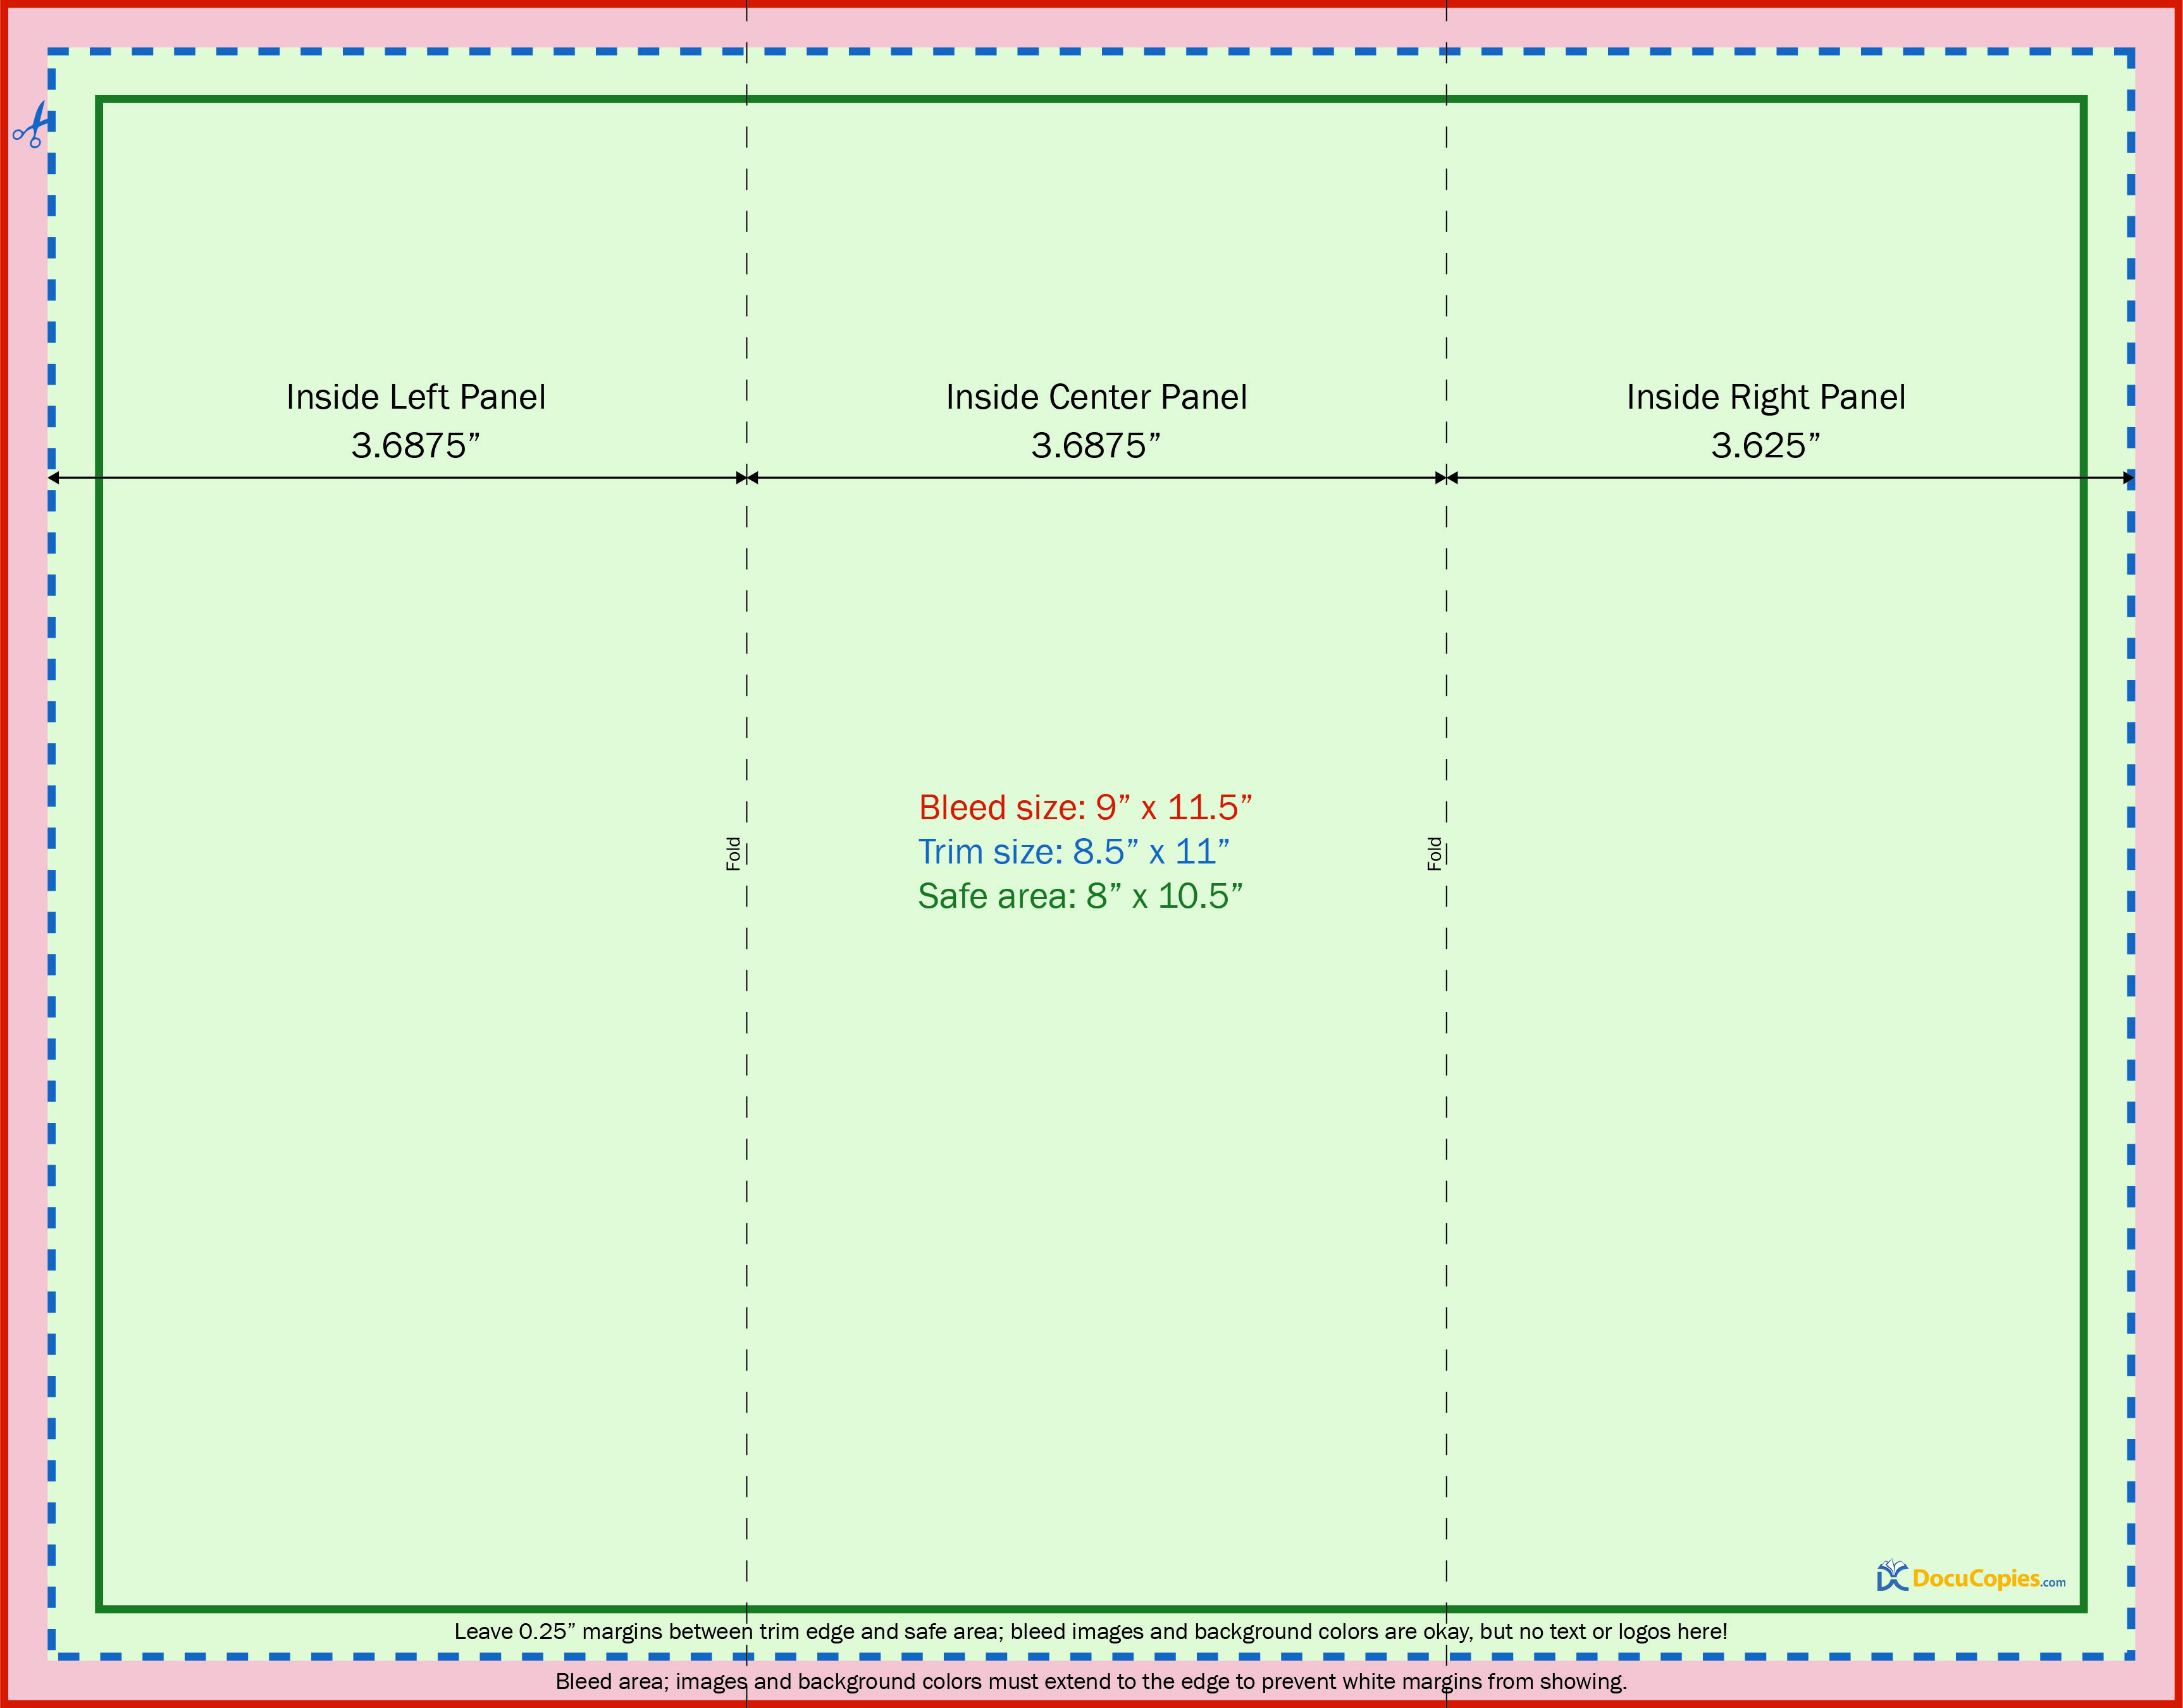
For the bleed brochure we will create a document that is a .5" larger than our finish size of 8.5x11, meaning 9x11.5".
This document will have a .25" outer bleed margin and a .25" safe zone around each panel. The .25" safe zone is to make sure important content like text will not be cut off or folded through when the brochures are completed. The .25" bleed area should have images and background colors that are extended over from the main portion of the brochure. If this area is white when you're done designing your brochure, then you haven't setup the bleed correctly or your brochure does not need to bleed.
Don't simply scale your non-bleed artwork up to 9x11.5". This will cause the folding to be misaligned with your content. Instead, if you're adjusting your non-bleed artwork to bleed, adjust the canvas or artboard size to 9x11.5" and extend only your bleed content to the edge.
Brochure: Bleed Outside

Brochure: Bleed Inside

The bleed brochure design is essentially the same as the non-bleed except our page size is 9" x 11.5" with a .25" bleed area around the page. YOU MUST HAVE A .25" BLEED AROUND YOUR FILE. An .125" bleed area will not work for our printers. Carefully check that you do not have any important text in the safe zones. If you do have text in the safe zones then there is a chance it could be cut off or folded through.
STEP 2: Design Your Brochure
Non-Bleed Brochure Design:
Since you are unable to have content in the printer margin of the non-bleed design it is usually a good practice to not have any content in the safe zones between panels. This will make the panels appear even when folded, whereas if you had content in the safe zones then the panels will appear uneven when folded and leave your brochure looking unprofessional.

To maintain an even .25" white margin around all the panels we do not have any content in the safe zones between panels. This will give you the best appearance for a non-bleed brochure. If you do not like how this looks then you will probably want to design a bleed brochure.
Bleed Brochure Design:
For the bleed design we are able to have background images, colors, and other non important content in the bleed area as well as the safe zones. You still will not want to have any important content such as text or readable information extending into these areas. As you can see from the design below, a bleed brochure will give you a much more consistent and professional looking brochure than a non-bleed design.

For this bleed brochure design we have a background image that extends across all 3 panels and into the bleed area. All of our text is formatted right up to the .25" safe zone. As you can see the bleed design gives all of the panels a consistent look when folded or opened.
STEP 3: Test Fold Your Design
Once you have completed both sides of your brochure it is a good idea to print out your design and fold it to make sure everything appears and folds correctly. If you are printing a copy of a bleed design remember that .25" will be cut off to create the bleed so when you run a test print you will want to crop your design down to 8.5x11 just for the test. If you have done everything correctly no important information should be effected by the fold.
You can see below the comparison of the two designs side by side. Notice how the bleed design is now trimmed to 8.5x11.

This is what a finished non-bleed brochure design should look like before it's folded. We have no content in the printer margins and we have no important content where the document will be folded.

This is what a finished bleed brochure design will look like when it's trimmed to 8.5x11.
STEP 4: Review and Save
If you have further questions about designing a bleed brochure, please review our general bleed design tutorial. If after reviewing that page you still have questions you may call us and speak with one of our prepress technicians.
Once your design is completed, your brochure is ready for printing.
Ready to print your tri-fold brochure?
Tri-Fold Brochure PrintingSee All Brochure Folding Processing...