How to Set Up Files for Printing
Follow this helpful checklist to ensure your files are set up correctly for professional printing services.
Whether you're a seasoned graphic designer or a humble newbie, there are certain details to keep in mind when setting up your files for printing. Some of these will vary depending on what kind of print process is being used, what kind of product you're ordering, and any additional finishing options that are needed.
To view file setup guidelines for a specific product, click on a sub-section below:
When designing documents for digital printing in general, graphic designers need to consider several factors to ensure optimal results. These are some things to keep in mind no matter what kind of product you're ordering:
Color mode:
Graphics which are made to be viewed on screens are typically RGB (Red, Green, and Blue), which mixes with the white backlighting of your screen to create the millions of colors you see.
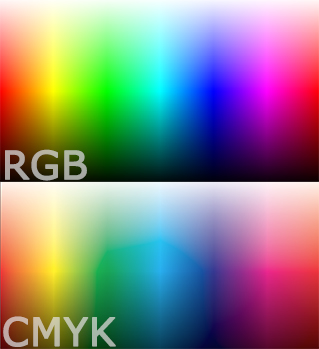
Digital printing uses toner instead of ink and is limited to CMYK (Cyan, Magenta, Yellow, and Key/Black). Since there is no white toner, the color of the paper itself plays an important part in creating all the shades and tones available. But this also makes it impossible to reproduce all the colors from the RGB spectrum, since the white paper cannot mix with the colors in the same way that light does with a digital display.

Many people still design their files in RGB, knowing there may be some variance in how the image gets printed. But designing or previewing your file in CMYK before sending it to print should help avoid any big surprises.
Image Resolution:
Use high-resolution images and graphics to maintain sharpness and clarity in print. Typically, a resolution of 300 pixels per inch (PPI) is suitable for digital printing. Images taken from websites are most often only 72 PPI. These may look OK when printed at a small size, but the image quality quickly degrades when scaling these images up. (See Image Compression and Artifacts below)
Bleeds:

🔍 Special setup is required to print to the edge.
If you need your artwork to print all the way to the edge of the sheet, you must order a bleed and make sure your file is setup correctly to accommodate this. Bleeds require printing your image slightly larger than the finish size, then trimming off the extra paper to remove the white borders.
Bleed setup involves extending your artwork or background colors/images beyond the final trim size to prevent any white edges when the document is trimmed. Most products require 0.25" or 0.125" bleeds. This means an 8.5x11" print file should be 9x11.5", with the extra space containing only the content which should print to the edge.
Any logos, text or important information should be at least an additional 0.25" from the trim line, or 0.5" from the edge of the 9x11.5" document.

🔍 Special setup is required to print to the edge.
0.25" Margins:
When not ordering a bleed, you must leave at least 0.25" blank margins around the edges of the design. If no margin is included, your artwork will be scaled down to fit within the printable area.
Books and sheets with 3-hole drilling need additional room on the binding edge. We recommend adding an additional 0.25" for the holes and/or bindings. For simplicity's sake, many people just leave 0.5" all the way around. Otherwise, make sure to alternate the extra space from left to right, assuming your pages are double sided.
Fonts and typography:
The presentation and clarity of your text content can be affected by the fonts you choose. To avoid any errors or degradation of quality, make sure to follow these steps:
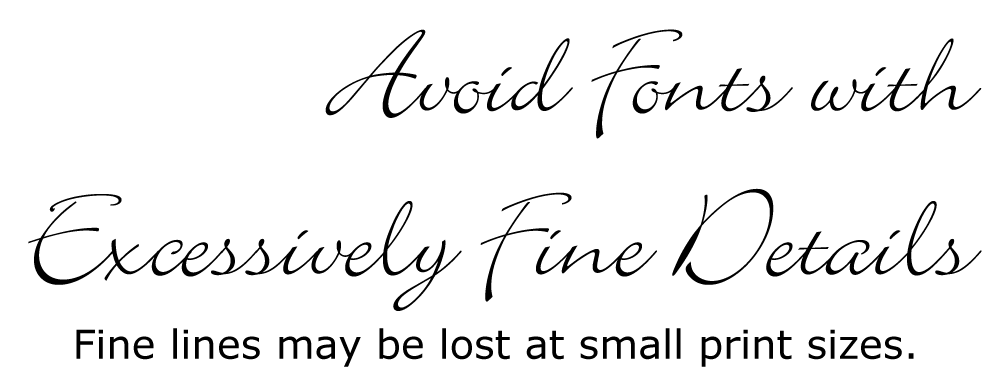
- Choose fonts that are legible and suitable for printing.
- Avoid using fonts that are too thin or have intricate details, as they may not reproduce well in print at small sizes.
- Embed or outline your fonts to ensure they appear correctly on the printer's end. If you're unsure how to do this, search your design program's Help document or do a web search for "how to embed fonts in [software]".
File format:
Saving your document in a print-ready file format such as PDF will preserve the design integrity and ensure compatibility across different printers and operating systems. Other flattened image files, such as TIFF, JPG and PNG, also work, but may not preserve the quality as well as PDF.

🔍 The fuzzy color blobs are called artifacts.
Image compression and compression artifacts:
Be cautious while compressing images in your document, as excessive compression can lead to loss of image quality and introduce compression artifacts.
Artifacts may also appear if you're scaling a small image up to a larger size, as shown in the example image.
Strike a balance between file size and image quality to maintain the desired print output.
Proofing and test prints:
Always review and proofread your design before sending it for printing. If the job's presentation or color accuracy is crucial, order a Hard Copy Proof. This will allow you to review 1 copy before committing to the entire quantity ordered.
Your may also request a digital proof free of charge in the Job Notes.
Color accuracy:
Digital printing (toner) does not allow perfect PMS Pantone color matching like many offset and inkjet printers. The color tones are created by mixing Cyan, Magenta, Yellow and Black/Key toner (CMYK) with the paper's natural color (generally white), which cannot produce as many colors as ink presses.
Some brighter color tones may appear slightly duller compared to digital displays, inkjet printers, or offset presses, due to the process described above. If color accuracy is essential, first make sure that your monitor is calibrated as closely as possible to a CMYK color profile. Design your files in CMYK, too. And make sure to order a proof.
Following these guidelines will help avoid costly mistakes while ensuring your design translates well from the screen to the printed page. If anything is unclear, make sure to ask questions!
 Processing...